
Elaine Powell, Director, Regulatory Compliance, dentalcorp; Jaime Robertson, Manager, Regulatory Compliance, dentalcorp
In dentistry, infection prevention and control (IPAC) is of paramount importance, and sterilization centres play a vital role in protecting the health and safety of patients and practice teams. However, each dental practice must have safeguards in place to ensure that instruments are being sterilized safely and effectively.
Despite being a crucial component, the cleaning process of reusable instruments prior to sterilization is often overlooked. If biological contamination and other debris are not removed correctly, it can compromise the entire sterilization process and jeopardize the safety of patients and team members.
Dental practices must decide how they want to streamline the instrument cleaning process in order to effectively remove bioburden prior to packaging. Scrubbing contaminated instruments by hand is no longer the preferred choice; many practices are instead opting to use automated cleaning equipment like ultrasonic cleaners and instrument washers due to their ability to increase productivity, improve cleaning effectiveness, and reduce the risk of injury.
Ultrasonic cleaners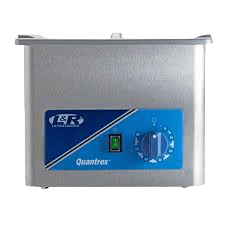
This type of cleaner removes bioburden by using electrical energy to disrupt chemical bonds which hold the debris on instrument surfaces. The ultrasonic cleaner is turned on, instruments are placed inside, and the timer is set for the recommended period per manufacturer’s instructions. The instruments should then be rinsed, checked for remaining debris, dried, and held for packaging.
The solution should be changed whenever cloudy or, at a minimum, on a daily basis. Weekly testing for efficacy is required, and the results (as described below) must be recorded on a log sheet. The absence of logging the test results is a common deficiency reported by external auditors and it is vital that dental practices provide proof that the process has been performed.
How to test your ultrasonic cleaner
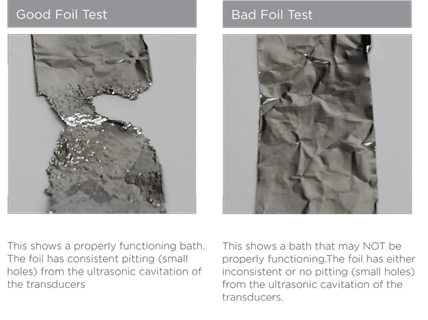
Aluminum foil test
1. Perform the test using a fresh tank of ultrasonic cleaning solution prepared according to the manufacturer’s instructions. The tank should be filled within one inch of the brim
2. Run the ultrasonic cleaner for five minutes. Any heater should be turned off and the cleaner set to its maximum power setting, if applicable
3. Cut a piece of standard aluminum foil measuring approximately the length of the tank (longer edge) by the depth of the tank plus one inch
4. Immerse the foil vertically in the tank with the long edge of the foil aligned with the long edge of the tank; the foil should be aligned roughly in the center of the tank, with the foil extending down almost to the bottom of the tank but not touching the bottom
5. Hold the foil in place and run the ultrasonic unit for exactly 20 seconds, then remove the foil
6. Interpret the results of the test as follows:
o PASS: There is a tiny pebbled or peppered effect displayed evenly over the entire surface of the foil
o FAIL: There are areas of foil greater than ½ inch square that do not display any pebbling
7. If the ultrasonic cleaner passed the test, record the results in the test log
8. If the ultrasonic cleaner failed the test, perform a second test using new foil
9. If the second test results in failure, remove the ultrasonic cleaner from service and contact a repair technician; retain both foil samples to provide to the technician
 Source: www.dentsplysirona.com
Commercially prepared ultrasonic cleaner efficacy tests
Easy to use test strips are available to check if the cleaning process is effective and they provide a visual result to determine if your ultrasonic cleaner is functioning properly.
1. Test strips are a very thin aluminum strip or paper, which contain a sample-soil area on the strip that mimic the presence of blood and tissue that may be found on instruments
2. To perform a test, insert the strip into a holder that must be purchased with the first package of test strips. The holder will only permit the test strip to be inserted the correct distance, allowing the soil to remain fully exposed
3. Place the holder containing the test strip on the middle of the instrument tray with the soil facing up, fully submerged in solution. Do not clip the holder to the side of the tray and do not cover or crowd the test device as this may produce inaccurate results
4. With the test strip in the ultrasonic cleaner, select a wash cycle. A short wash cycle is all that is required to perform this test (follow MIFU)
5. Upon completion of the wash cycle, verify the results of the test strip
o A test strip resulting in complete removal of all the test soil indicates a successful test and your system is properly functioning
o If only partial areas of the soil sample are visible, there may be several contributing factors. This includes water impurities, incorrect temperature, expired or damaged strips, incompatible materials (rubber and certain plastics can impede ultrasonic activity), incorrect dispensing, or non-sanctioned detergents
6. Record the results in the test log
Automated instrument washers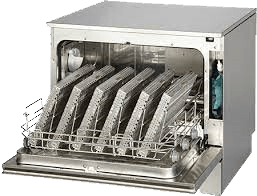
An automated instrument washer also provides a safe, effective, and efficient way to clean instruments. These devices take care of the cleaning of dental instruments by providing an automatic process by eliminating steps such as pre-soaking, scrubbing, and drying of instruments. This means that instruments come out contamination-free, debris free, dry, and ready to be wrapped or bagged, then placed directly into the sterilizer. Most of the new instrument washers include data storage, service logs, and remote access capabilities. Plus, if there is ever a problem, the information needed for remote diagnosis can be sent by email to the local technician.
The claim is that instrument washers remove 99.9% of bacteria. The process can take 40 minutes to an hour to complete, depending on the cycle that is chosen. They generally accommodate more instruments than ultrasonic cleaners and will fit any size of cassette.
It is important to remember that the units may appear similar to a home dishwasher, but instrument washing equipment is considered medical equipment and is regulated. Commercially available household dishwashers are not designed to process instruments or to meet the same standards for safety and effectiveness.
How to test your instrument washer
Commercially prepared test strips are also available for automated washers. You must test efficacy according to manufacturer’s instructions for use.
1. Test strips are a very thin aluminum strip or paper, which contain a sample-soil area on the strip that mimic the presence of blood and tissue that may be found on instruments
2. To perform a test, insert the strip into a holder that must be purchased with the first package of test strips. The holder will only permit the test strip to be inserted the correct distance, allowing the soil to remain fully exposed
3. Place the holder containing the test strip flat on the basket with the soil facing up. Do not cover or crowd the test device as this may produce inaccurate results
4. With the test strip in the instrument washer, select a wash cycle. A short wash cycle is all that is required to perform this test (follow MIFU)
5. Upon completion of the wash cycle, verify the results of the test strip
o A test strip resulting in complete removal of all the test soil indicates a successful test and your washer is properly functioning
o If only partial areas of the soil sample are visible, there may be several contributing factors. These include water impurities, incorrect temperature, expired or damaged strips, incompatible materials (rubber and certain plastics can impede ultrasonic activity), incorrect dispensing, or non-sanctioned detergents
6. Record the results in the test log
It’s important to consider the long-term benefits when you evaluate and purchase new equipment. Reprocessing instruments using automated tools that improve efficiency, efficacy, and safety will help provide a healthy and safe workplace for all team members and ensure safe care for patients – making it a worthwhile investment.
About the Authors
Elaine and Jaime are registered dental hygienists who work closely together on dentalcorp’s Compliance team. Together they bring experience in clinical, regulatory, and educational capacities. They are passionate about infection prevention control and assisting practices in providing safe and effective patient care. They have guided and supported over 400 practices through the Covid-19 processes required across Canada.
